The Coordinated Robotics Lab, UCSD developed small robots that capable to climb stairs and even overcome large obstacles. The robot has to be small, so this special constraint brings them to design robot in an unique way.
Halloween is coming, and people are working hard on making somethings scary to "celebrate!". PIR motion sensor is very useful for this purpose, as you will like your scary machine to operate only when someone is passing. Let's check out this "Jan in the Pan" project, you may get the ideas:)
It is an Infrared distance made by Sharp, you can see this sensor used in many hobbist projects. I got one in my electronic bag, but still not yet have a test. Robotroom website got a quite good measurement on the GP2D12 analog voltage against the distance, it may be a good reference if you are going to work on GP2D12. Another good reference is from uCHobby, they connect a GP2D12 with servo and visualize the measuring in radar like pattern with "Processing", source codes are provided as well:)
We have worked on LED matrix for so many times, but mostly for text scrolling, so how about make some animations on it? But we are too lazy to make the animation patterns to the C header file in an array of bytes. We finally finished one tool may be useful for all led matrix lovers!
The gif2led project is written in Ruby, required Rmagick library for gif manipulation. It is mainly designed for 8 or less columns matrix, for instance 8x8 matrix, 10x8 matrix, 5x7 matrix etc. It output an pattern header file with a 2D array frame by frame from an animated gif input. We only tested with AVR-gcc, but it should be useful for other MCUs too. You can find more information on the gif2led project page, http://labs.bitartist.org/gif2led/
Let start with our demonstration, the project is called LED Egg, it is based on a 10x10 matrix (but we only use 10x8 in our case) with an Egg case to hold the circuit board.
To prepare the animated gif, we use macromedia Flash, and here is the screenshot:
Noted that the frame 0 (marked as CAL above) is a special frame, which used for calibration. When used with gif2led tool, the frame 0 is the pattern of your led matrix with all led ON.
and then export the movie to an animated gif:
Then simply run the following command, we can obtain the 2D array header file:
Now, we have to prepare the circuit part, we use AVR tiny13 together with 4017, please refer to the circuit diagram<here>. 4017 is used as a row counter, and such that we can only use 1 pin for row shifting. The remaining 4 IOs of the tiny13 would use for column output, we are using 10x8 matrix this time, so we assume the pattern is symteric to save pins, so 1 I/O drive 2 columns in our case. The circuit showed below:
So Lets add an egg case, the egg is made from pu foam plastic, it is used for Easter decoration.
Video demonstration:
Close look on the LED pattern:
To download the gif2led tool, AVR source codes, and flash template, please find in the following links:
Wow, philips worked on many LED products recently, and here we have a LED lamp for your living room. May be someone can use for some art projects. The controller is very cool, it is a touch wheel and you can change and set the color easily. May be you can try to set the color to reflect your mood everyday. Enjoy.
In this easter, we finished a "non-electronic" project and find no where to post. Hope it is not so off topic here:)
There are few web cameras installed to monitor the weather or traffic conditions online, so what else information can we get from these images? One important thing to us is the color of the sky. It is a sign of weather and also the pollution condition. So this small project comes up.
we developed a program to analyze the color of the images and look for the best blue. The process includes four steps: 1) Fetching image from the web camera (an automatic web image fetcher is used) 2) Color Segmentation (Masking out the non-sky component) 3) Analyze the blueness (Finding out the best blue) 4) Output a small square image colored in best blue found in step 3
The color segmentation is the most difficult part, the blueness is hard to define. Luckily, we can easily find many digital images nowadays in flickr or other online gallery system. We used the images to train our color segmentation engine and also with some human fine tunings.
We got 365 images from the Hong Kong Observatory (Yes, we live in HK) in the year 2006. The sky with no blue-like color is ignored in step 4, it happened in cloudy or rainy or dusty day and so you will see a gray or white cloudy sky, i.e. no color captured.
A processed image from step 1 - 3 (Buildings are masked)
A sky color palette is generated for the year 2006 in HK: - the pink box is the start of the month (e.g. JAN)
In a statistical view, we make a sky color bar chart for each month. What we can get in this chart? 1) Second half of the year, we get a clearer sky. 2) In August, we have more blue sky days.
This "wind bell" shaped lamp is called "Wind-Lit", created by LivingWorld.net. There are few LEDs inside the case, when the wind blows that making the bottom place move, it triggers the LED to grow. It is a nice idea to make a growing LED project with wind activation which provides some random effects and most importantly the link between the nature and you. The new version included a solar panel charging in day time, and the LED grows at night time. It is a prefect product for your garden.
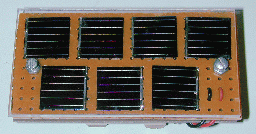
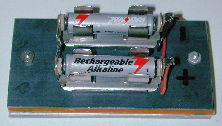
After studying how to make a simple solar charger, I decide to make a fast prototype to test. I got one solar panel a long time ago, the ratings of this solar panel is unknown. The solar panel will output different voltage and current under different lighting condition, so we have to measure it before use. I measured this solar panel would output maximum 3V under bright sunlight, and output 2V under my table lamp.
Everyone got a table lamp when working in front of the computer, and the light condition will remain considerably constant when compare to the outdoor sunlight condition. It would be easy to make one simple table lamp charger.
The above diagram is my setup, I used the schottky diode (IN5819) to prevent back current flow to solar panel when the lamp is off. The diode is placed between the solar panel and the the battery holder with two AAA batteries loaded. When charging, I measured the forward voltage across the diode is 0.14V which is small when compare to a normal diode.
Initially, the voltage across 2 batteries are 1.7V, after a while the voltage is 1.81V, so it is charging right now. The charge current measured is only 0.12mA.
The current is too small, and not so sure how long it will charge up to 2V:)
5x7 dot matrix Led display is usually used to cascade together to make a large led matrix display as you see in train station.
(A typical LED matrix display)
The small size of 5x7 dot matrix led display is good for small electronic project, typically the 5x7 dot matrix is used to display one character a time, i.e. 5x7 dot matrix font. In order to use only one 5x7 dot matrix to display information, we have to use the 5x7 dot matrix horizontally. We use the 5x4 dot matrix font instead and of course text scrolling will be necessary.
The KAAS Led flower vase is using the 5x7 dot matrix display for displaying messages. kaas used one AVR tiny13 and two 74hc595 chips to drive the led matrix, the result is very impressive. The detail information of the LED flower vase is here.
Another interesting project is the Twitter LED scroller Build from davidnin. He used the Arduino board and one 74HC595 to drive the 5x7 dot matrix led. Please check out the cool video:
Another project from us, GIF2LED! it allows you to convert a gif animation to LED header file to speed up your coding time:)
Solar power is not a news nowadays. People are finding better ways to get power without harming the earth. To use of solar power, you need the solar panel that converts solar energy to electricity. So how to make a small solar charger for your home use? This solorb's website teaches you how to make a simple AA battery solar charger, few components are needed, a nice choice for your home project.
The project needs few solar cells, and 1 1N5818 Schottky Diode and of course the AA rechargeable battery. Why Schottky diode? this diode have less voltage drop when current flow through, it is important as we want to be sure the energy is not wasted on the diode which is only used for preventing the current through back to damage the solar panel when the charger leave in the darkness. You can also buy the solar kits from the author website as well.
Take it into real life application, you may add the solar charger to your radio! Let's read the tutorial bought you by gotwind.org "DIY Solar Powered radio for $5", the theory is the same as the AA charger.
Another video showing a home-made solar USB power charger:
I found this special Red led bubble in ebay by (powerandlight). It looks so cool to me. I didn't see this led before, I found out that it should be similar to one used in TI-59 or other old calculators in the year 1977. It was not in production anyway. Each bubble can display A-Z and 0-9. It should be the same as 15 segment LEDs nowadays. I hope it can be larger otherwise it is so small to use as a cool display.
Jeroen used the AVR ATtiny2313 with 74HC595 to drive this cool red bubble, as he called "Starburst Led" project:
I found a working stargate project on the youtube. Of course, it is not the real stargate from the ScFi drama "Stargate SG-1", it cannot make a wormhole to transfer you from one planet to another planet. It is a home-made model for simulating the gate dialing and wormhole establishment. The model is pretty nice, it used many leds to simulate the wormhole pattern. Take a look on this video:
There are different kinds of connector, socket and header used in electronic projects. The folks in scienceproj.com sorted out some of the common parts and describe in details.