Showing posts with label knowledge. Show all posts

Monday, March 3, 2008

Table Lamp Solar Charger (Solar Charger Test setup)


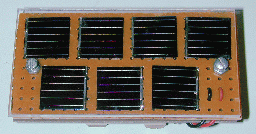
After studying how to make a simple solar charger, I decide to make a fast prototype to test. I got one solar panel a long time ago, the ratings of this solar panel is unknown. The solar panel will output different voltage and current under different lighting condition, so we have to measure it before use. I measured this solar panel would output maximum 3V under bright sunlight, and output 2V under my table lamp.

Everyone got a table lamp when working in front of the computer, and the light condition will remain considerably constant when compare to the outdoor sunlight condition. It would be easy to make one simple table lamp charger.

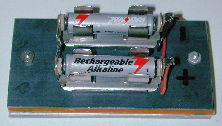
The above diagram is my setup, I used the schottky diode (IN5819) to prevent back current flow to solar panel when the lamp is off. The diode is placed between the solar panel and the the battery holder with two AAA batteries loaded. When charging, I measured the forward voltage across the diode is 0.14V which is small when compare to a normal diode.

Initially, the voltage across 2 batteries are 1.7V, after a while the voltage is 1.81V, so it is charging right now. The charge current measured is only 0.12mA.


The current is too small, and not so sure how long it will charge up to 2V:)

Sunday, February 24, 2008

Solar Power, the green power source.

Solar Power Charger

Solar power is not a news nowadays. People are finding better ways to get power without harming the earth. To use of solar power, you need the solar panel that converts solar energy to electricity. So how to make a small solar charger for your home use? This solorb's website teaches you how to make a simple AA battery solar charger, few components are needed, a nice choice for your home project.


The project needs few solar cells, and 1 1N5818 Schottky Diode and of course the AA rechargeable battery. Why Schottky diode? this diode have less voltage drop when current flow through, it is important as we want to be sure the energy is not wasted on the diode which is only used for preventing the current through back to damage the solar panel when the charger leave in the darkness. You can also buy the solar kits from the author website as well.

Take it into real life application, you may add the solar charger to your radio! Let's read the tutorial bought you by gotwind.org "DIY Solar Powered radio for $5", the theory is the same as the AA charger.


Another video showing a home-made solar USB power charger:

Solar Powered USB Charger - Cheap And Easy To Make! - The most popular videos are a click away


A very comprehensive study on Solar power charger: REUK.co.uk - Solar Battery Charging.

Thursday, February 21, 2008

Red Led Bubble From the 70s.


I found this special Red led bubble in ebay by (powerandlight).
It looks so cool to me. I didn't see this led before, I found out that it should be similar to one used in TI-59 or other old calculators in the year 1977. It was not in production anyway.
Each bubble can display A-Z and 0-9. It should be the same as 15 segment LEDs nowadays. I hope it can be larger otherwise it is so small to use as a cool display.

Jeroen used the AVR ATtiny2313 with 74HC595 to drive this cool red bubble, as he called "Starburst Led" project:

Monday, February 18, 2008

Information on Integrated Circuit/IC Packaging.


Integrated circuit is the key component of every electronic project, it can be simple as logic gates, counter, multiplexer to highly complex microprocessor. When you buy IC online for your project, the same IC may have different packages, you have to choose the right package type for your prototype. For example, DIP, PLCC, BGA etc. This website (Integrated Circuit, IC Package Type) gives you a list of common package type definitions, you can get more information there. For me, I usually make my project on the wooden prototype board, so surface mount package type is not prefer unless I make the PCB myself. I usually used the DIP package for the microprocessor(MCU) and also the other IC, like 74HC595 and 555 Timer. It is easy for soldering and also wire wrapping.


#1 - Transistor with TO-92 package


#2 - MCU(AVR tiny13, DIP package) contains in a plastic tube.


#3 - 74HC595 IC in DIP package plugged into the wooden prototype board.

If you really want to find in depth information of the IC packaging type, please visit this website: Discrete Packaging (Fairchild Semi)

Information on connectors, sockets, headers.

There are different kinds of connector, socket and header used in electronic projects. The folks in scienceproj.com sorted out some of the common parts and describe in details.


Read More <Link>