I used AVR tiny13 for small applications very often, and mostly it is powered by only small battery. It is easy to put the AVR MCU to power save mode with avrlib, just few lines of code would do. To wake up the AVR MCU, you should setup interrupt before falling into sleep mode, either pin change interrupt or external INT0.
Here is my sample code (waked up by pin change interrupt)
//do nothing in interrupt func. ISR(PCINT0_vect){ cli(); }
while(1) { b1_low; //turn off sei(); //enable interrupt set_sleep_mode(SLEEP_MODE_PWR_DOWN); //set sleep mode sleep_mode(); //sleep now //wake up point here //
while (PINB & 0x1) { //if PINB is high on_bulb(); }
}
I only measured once I finished the demo circuit, and it should use around 10 times less power when AVR is in sleep mode. Have fun.
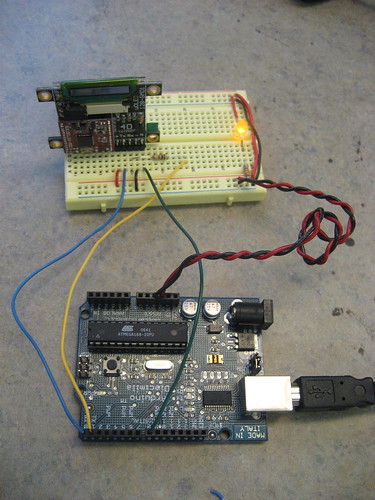
When we design lighting circuit, we would like to light up the LEDs only when there is somebody around. The PIR sensor is a motion sensor based on passive infrared sensor which senses infrared emitted by human body. I got the PIR Module "KC7783R" from local store, which includes the PIR sesnor and also the KC7783 motion detection IC.
The PIR module is very easy to use, it contains only 3 pins (1-Signal, 2-Vcc, 3-Gnd), where it detects somebody moving, the signal line goes high for a period of time (3 secs for example).
Here is my test circuit to drive one auto-flashing RGB Led with PIR module:
Live action:
My another demo of using PIR module, combining the use of AVRtiny13 as a timer. When it detects motion, it will light up the light bulb for 10 seconds, afterward it will go into deep sleep to save power and wait for the next interrupt send by PIR module.
Digital Clock is a good start project for learning microcontroller, Naliga used a PIC MCU to make a digital clock, includes schematic, pcb layout and source codes. It is easy to follow and detail, you can find the link here:
It is an open source project called "AVGA", which uses only a single AVR ATMega168 to create a super mario clone. Schematics and firmwares are provided freely!
After I completed the LED egg prototype with Atmel AVRtiny13 and a 10x10 LED matrix, I passed the LED egg to kaas, she worked very hard to decorate the LED egg case. It is very pretty now and I am happy to show you here.
LED is a light emitting diode, it is commonly used as output device. But by connecting each end with GPIO, you can use it as input device with some software tricks. This idea is cool, and I remember the first time when I got this idea was from the cool research site "Multi-Touch Sensing through LED Matrix Displays", you can find the information here: http://cs.nyu.edu/~jhan/ledtouch/
Recently, I found someone use the same idea to implement a LED input sensing demo with ATmega8, it is very interesting.
Pascal Stang is really nice to make the AVRlib freely available for AVR developers. (he is also the author of ARMLib).
The AVR Lib contains codes for nearly all the function that AVR chip provide, eg. UART, I2C, SPI, PWM etc. Also it includes some high level functions like IDE/CF, GPS, LCD modules.
I didn't try it, but I am going to use it for the next project. Stay tuned.
Using AVR as a data logging system is cool, but data storage is a great problem as external eeprom or flash memory may be too small and expensive. I guess most of us have some 16MB and smaller SD card on your desk because nowadays you are using 2G SD cards on your camera!
4D Systems makes some really nice serial OLEDS. They aren't hard to use, but the documentation for them is very scattered. This tutorial pulls together the various pieces i've found so that you can get up and running very quickly.
Lumindot is a new kind of toy for children produced by Bandai, it is a Backlit frame with 70x50 holes on it, so you can put the colorful pins in the hole. It is a very cool way to do pixel arts, it looks like a 70x50 Led matrix if you know about electronics.
Recently, I am addicted to this book "iWoz" by Steve Wozniak, who is the co-founder of Apple. He shares the experiences, thought of making all the cool products and inventions in an engineer perspective or he claims that is an artist view. He can also help you understand how the first home computer was born: the Apple I & II. He is really a fun person and passionate about technology and who really want to use technology to improve people's life.
I have made one cell phone strip and one necklace by using the laser-cut service provided by Ponoko. You prepare a vector graphic design and choose what materials (plastic or wood) to cut out your masterpieces in Ponoko.
It is pretty good though the shipping cost is really too much for me. Anyway, I worked it out. I think it may be a good idea to make your robot parts or your electronic project enclosure next time with this online laser cut service.
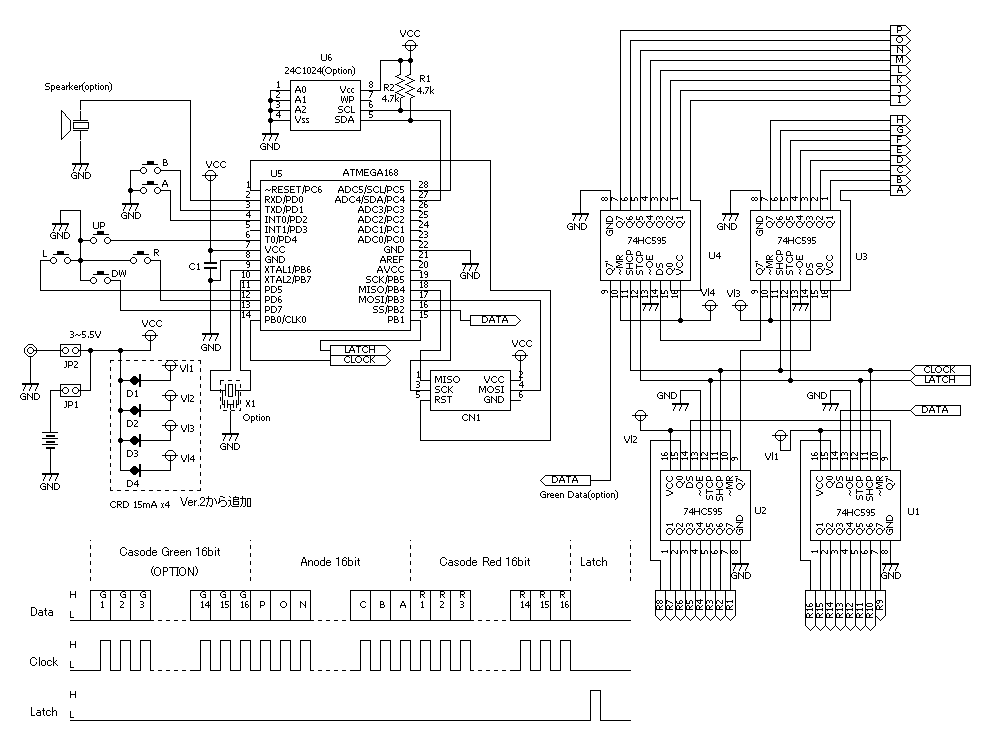
It is an AVR LED game console kit made in japan. It uses ATmega160 and four 74HS595 chips to extend output pins for controlling a 16x16 dot matrix led panel. It also comes with a speaker and joystick to help you start making a cool gaming console!
No fancy accelerometers, no complicated algorithm and circuits. Only a motor and a simple touch sensor, it is really cool to see such small and neat robot.
Just came across a AVRtv channel on youtube, it is the ATMEL AVR marketing channel for promoting new microcontrollers, recently playing XMEGA, and also the new UC3 series.
One simple PIC 16F628, few transistors and resistors, and 36 LEDS., Olivier worked with his son to make this lovely project. He also wrote a VB application to generate the LED pattern to ease of the works of his son. In his site, circuit diagram is also included, it is definely a lite project for fun.
The device is called "Craft" by www.linusakesson.net, it used only one ATmega88 to producce both video & sound on the TV. The animation is awesome, please take a look:
I always want to build a nixie clock, but it is difficult to find the nixie tube and also the tube driver ICs. The kit available on the internet is still expensive for me.
Here is a cool video of nixie tube filling with blue led, it becomes more attractive!
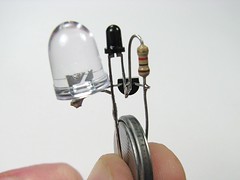
There are two OC0A and OC0B compare outputs in Tiny13. It is useful to generate waveform . In this example, we use OC0A to output a square wave to blink the LED which is very similar to the previous timer interrupt example instead the output is generate inside Tiny13 but not our interrupt routine.
Sometimes we have to do somethings in certain period, so timer may be useful for you. AVR tiny13 have one timer and it count until to 0xFF value for each clock. An interrupt will be then generated and call your interrupt routine.
In our example, we have the following interrupt routine:
ISR(TIM0_OVF_vect) {
       if (led){
               b0_high;
               led = 0;
       } else {
               b0_low;
               led = 1;
       }
}
We have worked on LED matrix for so many times, but mostly for text scrolling, so how about make some animations on it? But we are too lazy to make the animation patterns to the C header file in an array of bytes. We finally finished one tool may be useful for all led matrix lovers!
The gif2led project is written in Ruby, required Rmagick library for gif manipulation. It is mainly designed for 8 or less columns matrix, for instance 8x8 matrix, 10x8 matrix, 5x7 matrix etc. It output an pattern header file with a 2D array frame by frame from an animated gif input. We only tested with AVR-gcc, but it should be useful for other MCUs too. You can find more information on the gif2led project page, http://labs.bitartist.org/gif2led/
Let start with our demonstration, the project is called LED Egg, it is based on a 10x10 matrix (but we only use 10x8 in our case) with an Egg case to hold the circuit board.
To prepare the animated gif, we use macromedia Flash, and here is the screenshot:
Noted that the frame 0 (marked as CAL above) is a special frame, which used for calibration. When used with gif2led tool, the frame 0 is the pattern of your led matrix with all led ON.
and then export the movie to an animated gif:
Then simply run the following command, we can obtain the 2D array header file:
Now, we have to prepare the circuit part, we use AVR tiny13 together with 4017, please refer to the circuit diagram<here>. 4017 is used as a row counter, and such that we can only use 1 pin for row shifting. The remaining 4 IOs of the tiny13 would use for column output, we are using 10x8 matrix this time, so we assume the pattern is symteric to save pins, so 1 I/O drive 2 columns in our case. The circuit showed below:
So Lets add an egg case, the egg is made from pu foam plastic, it is used for Easter decoration.
Video demonstration:
Close look on the LED pattern:
To download the gif2led tool, AVR source codes, and flash template, please find in the following links:
Wow, philips worked on many LED products recently, and here we have a LED lamp for your living room. May be someone can use for some art projects. The controller is very cool, it is a touch wheel and you can change and set the color easily. May be you can try to set the color to reflect your mood everyday. Enjoy.
Just come across this cool video of a DIY propeller clock, it is based on the concept of POV system. The basic components are motor for spinning, LEDs for display and the microprocessor for the main control. Please take a look:
Arduino is an easy to use AVR platform, you can program it easily using serial port, and power it up with USB. With a very nice IDE and cool user library.
If you think the AVR on the arduino is not powerful enough for your project, let's consider the quad core arduino tower:
The Propeller chip makes it easy to rapidly develop embedded applications. Its eight processors (cogs) can operate simultaneously, either independently or cooperatively, sharing common resources through a central hub. The developer has full control over how and when each cog is employed; there is no compiler-driven or operating system-driven splitting of tasks among multiple cogs. A shared system clock keeps each cog on the same time reference, allowing for true deterministic timing and synchronization. Two programming languages are available: the easy-to-learn high-level Spin, and Propeller Assembly which can execute at up to 160 MIPS (20 MIPS per cog).
It is a powerful embedded processor from Parallax Inc, a well known embedded processor "PIC" inventor. With 8 cores, and total about 160MIPS processing power, you can do many amazing projects. You can see the above video involved many image processing!
another amazing project is the ybox2:
Adding an Ethernet chip, now you can access the internet cloud with a microprocessor that's capable of running a TCP/IP stack. This ybox2 can fetch information like weather, news from the internet and display it on TV which let me think of chumby widget devices.
Lumalive light-emitting textiles is very attractive technology developed by Philips.
A lumalive display panel with 14x14 RGB leds, using a special driver board, you can download the animation or text message via USB.
Philips Lumalive is a new medium to convey emotions and messages. It creates a positive spirit and boosts your energy level. We use colorful dynamic animations on textile products like garments, to make an unexpected striking appearance. By integrating multicolor LEDs (light-emitting diodes) into textile objects Philips Lumalive transforms them into communication platforms, while their textile look & feel retains. This is a distinctive way to experience, communicate and personalize.
Electroluminescent(EL) technology always uses in the backlit of small LCD. From wikipedia:
Electroluminescence is the result of radiative recombination of electrons and holes in a material (usually a semiconductor). The excited electrons release their energy as photons - light
Anyway, it is good for lighting.
I got the EL panel in a local store which should be powder phosphor-based electroluminescent panel. It is a 3.5" x 4.6" white light panel.
It included an adapter for converting 12VDC to AC for the EL panel.
Let's see how we can make use of this EL lamp.
1. Use for slice viewing
2. Put a Post-It on it, and you can see a growing Post-It in the dark.
3. For home lighting, illuminate your Toys.
4. A BackLit Photo Frame
Step 1 - To make a DIY backLit photo frame, you can get a large photo frame in store or you can make one yourself. Here we are:
Step 2 - Glue the panel in the back cover of the photo frame. You can see there is about 1.5 inch space between the photo glass panel and the back cover. We like to have some distances apart the EL panel and the glass to diffuse the strong illumination of the EL.
Step 3 - Power Up.
It looks alot better on my desk, sorry for my poor photo skill. Let's see the photo frame in action in the below youtube video. Enjoy It.
Anyone who want to get this EL panel (3.5" x 4.6"), We can order it for you. It is only US$15, and $5 for shipping to US and Canada. For payment, We use paypal. Please contact us: order@bitartist.org
Simple automatic instruments are constructed from local materials and objects on site. The system learns the sounds it can make by trying out its instruments, and then uses its range of sounds to try to reproduce the rhythmic and melodic qualities of sounds such as the voices of visitors. It then loops and alters these imitative sequences into improvised compositions. (That last part's not done yet, so you won't see it in the video.)
It is very cool, the robot plays the instruments with servo motors until it matches the surrounding music/tone. It needs sometime to make it right, still it is an amazing project.
Hydrogen fuel cell is the next green source of energy, by breaking down water (H2o) into hydrogen (H2) and oxygen (O2), the hydrogen can be used for energy generation afterward. It is still a long way to go in normal usage, but how well is the technology now?
Horizon Full Cell Technology introduced a Toy Car using their fuel cell technology. You can buy a toy car in affordable price to taste this bleeding edge technology.
In this easter, we finished a "non-electronic" project and find no where to post. Hope it is not so off topic here:)
There are few web cameras installed to monitor the weather or traffic conditions online, so what else information can we get from these images? One important thing to us is the color of the sky. It is a sign of weather and also the pollution condition. So this small project comes up.
we developed a program to analyze the color of the images and look for the best blue. The process includes four steps: 1) Fetching image from the web camera (an automatic web image fetcher is used) 2) Color Segmentation (Masking out the non-sky component) 3) Analyze the blueness (Finding out the best blue) 4) Output a small square image colored in best blue found in step 3
The color segmentation is the most difficult part, the blueness is hard to define. Luckily, we can easily find many digital images nowadays in flickr or other online gallery system. We used the images to train our color segmentation engine and also with some human fine tunings.
We got 365 images from the Hong Kong Observatory (Yes, we live in HK) in the year 2006. The sky with no blue-like color is ignored in step 4, it happened in cloudy or rainy or dusty day and so you will see a gray or white cloudy sky, i.e. no color captured.
A processed image from step 1 - 3 (Buildings are masked)
A sky color palette is generated for the year 2006 in HK: - the pink box is the start of the month (e.g. JAN)
In a statistical view, we make a sky color bar chart for each month. What we can get in this chart? 1) Second half of the year, we get a clearer sky. 2) In August, we have more blue sky days.