IEEE Spectrum published an article about the latest robotics trend for 2012. Be sure to check it out here:
http://spectrum.ieee.org/automaton/robotics/robotics-hardware/robotics-trends-for-2012
List of the robotic trends:
#1 CO-ROBOTS: ROBOTS AS CO-WORKERS AND CO-INHABITANTS
#2 3D SENSING: THE KINECT REVOLUTION CONTINUES
#3 CLOUD ROBOTICS: THE FORECAST CALLS FOR CLOUDS
#4 COMPLIANT ACTUATION: ROBOTS WITH A SOFT TOUCH
#5 SMARTPHONE-BASED ROBOTS: THE NEW ROBOT BRAINS
#6 LOW-COST MANIPULATION: A ROBOT ARM YOU CAN AFFORD
#7 SELF-DRIVING VEHICLES: COMING TO A STREET NEAR YOU
#8 FACTORY ROBOT HELPERS: THE FUTURE OF MANUFACTURING
#9 RAPID PROTOTYPING: A 3D PRINTER IN EVERY HOME
#10 UNMANNED AERIAL VEHICLES: CROWDED SKIES
#11 TELEPRESENCE ROBOTS: YOUR AVATAR IN THE REAL WORLD
#12 BIONICS: THE LINE BETWEEN HUMANS AND MACHINES GETS BLURIER
Tuesday, March 20, 2012


Thursday, March 15, 2012
My 3D Led Cube Assembled.
Recently, I buy a 3D Led cube from mainland China, it contains 8x8x8 Blue Leds. It powers up by normal USB +5V source. Also, It comes with a pre-programmed MCU, you get few features build-in (looping some cool 3d patterns, lamp and audio visualizer) .
The audio visualizer is very cool and handy, you can just plug in an audio jack and play music. There is API for you to control the leds via i2c, but I don't have time to try.
Let's see some photos:


 Audio Visualizer Demo:
The audio visualizer is very cool and handy, you can just plug in an audio jack and play music. There is API for you to control the leds via i2c, but I don't have time to try.
Let's see some photos:


Tuesday, February 21, 2012
Motion Tracking on a wireless router (OpenWRT)

Setup: TP LINK WR703N (installed OpenWRT), a USB camera (UVC compatible)
The WR703N comes with a USB host, so let's connect a USB camera to it. Usually a modern usb camera should work without problem, let's telnet to the router (e.g. telnet 192.168.1.1):
opkg update
opkg install kmode-video-core kmod-video-uvc
Once the kmod-video-uvc is installed, you can now attach the USB camera to the router, and then you will find a device file appears: /dev/video0
That's mean the camera should ready to go.
so let's install the motion package:
opkg install motion
The WR703N doesn't have enough flash memory, so I copy the motion configuration file to /tmp (RAM), and then you have to edit the motion.conf:
change stream_localhost on to off
change locate_motion_mode off to on
run it:
motion -c /tmp/motion.conf
View it:
Open a browser with the URL:
http://192.168.1.1:8081/
Demo Video:
Monday, February 20, 2012
My experience with OpenWRT on TP-LINK WR703N

Just got a TP-LINK WR703N, which is a low cost 3G-wifi router. It comes with a USB host, one LAN port, one WIFI interface, and a mini usb connector for power supply.
It would be a nice choice for hobbyist to hack and do somethings cool with it. For example, may be a WIFI enabled sensor is awesome!
Let's get started!
*** Do at your own risk! May damage your router ****
[Flash OpenWRT]
As it is a new device, I use the firmware upgrade web interface inside (http://192.168.1.1, admin/admin) to flash openwrt firmware:
Download the latest firmware from the openwrt website: http://downloads.openwrt.org/snapshots/trunk/ar71xx/openwrt-ar71xx-generic-tl-wr703n-v1-squashfs-factory.bin
Once it is flashed successfully, it will reboot and then you can try to telnet to it.
telnet 192.168.1.1
root@OpenWrt:/# cat /proc/cpuinfo
system type : Atheros AR9330 rev 1
machine : TP-LINK TL-WR703N v1 processor : 0
cpu model : MIPS 24Kc V7.4
BogoMIPS : 265.42
wait instruction : yes
microsecond timers : yes
tlb_entries : 16
extra interrupt vector : yes
hardware watchpoint : yes,
count: 4, address/irw mask: [0x0000, 0x0ff8, 0x0ff8, 0x0ff8]
ASEs implemented : mips16
shadow register sets : 1
kscratch registers :
0 core : 0 VCED exceptions : not available VCEI exceptions : not available
[Web Administrative Interface]
Once enabled telnet, you can try connect the LAN port to a router with internet access and it would be able to access the internet.
At this point, assuming you can access the internet in the openwrt telnet console. We are going to install the web GUI for easy configuration:
To retrieve the current list of available packages in the repository do
opkg updatethen for a full LuCI installation without HTTPS support enter
opkg install luci
Enable (so that it will be started at every boot) and start uHTTPd:/etc/init.d/uhttpd enable /etc/init.d/uhttpd start
You should now be able to connect with a web browser to you router : http://192.168.1.1/
(More info on http://wiki.openwrt.org/doc/howto/luci.essentials)
[USB mass storage]
Assuming you still have the internet access, let's fetch in the usb mass storage essentials:
opkg update
opkg install kmod-usb-storage block-mount
Also, you have to install the file system and codepage related modules.
for fat32 (Windows compatible), I installed the following:
opkg install kmod-fs-vfat kmod-nls-cp437 kmod-nls-iso8859-1
For other file systems, please check the following document:
http://wiki.openwrt.org/doc/howto/usb.storage
Now, you can mount the usb disk!
mkdir /mnt/usb
mount /dev/sda1 /mnt/usb
[USB to Serial : Silicon Labs CP210x]

The usb driver for cp210x is not available in the pre-complied packages, I have compiled using openwrt build system (based on Kernel 3.2.5), you can download here:
http://androidhk.com/usb2serial.tar.gz
put the *.ko in /tmp
and then
insmod /tmp/usbserial.ko
insmod /tmp/cp210x.ko
Once you attached the usb2serial adapter, the /dev/ttyUSB0 will be ready to use. Now, you can communicate with the MCU.
[References]
Official TLWR703N openwrt page: http://wiki.openwrt.org/toh/tp-link/tl-wr703n
(More info on http://wiki.openwrt.org/doc/howto/luci.essentials)
[USB mass storage]
Assuming you still have the internet access, let's fetch in the usb mass storage essentials:
opkg update
opkg install kmod-usb-storage block-mount
Also, you have to install the file system and codepage related modules.
for fat32 (Windows compatible), I installed the following:
opkg install kmod-fs-vfat kmod-nls-cp437 kmod-nls-iso8859-1
For other file systems, please check the following document:
http://wiki.openwrt.org/doc/howto/usb.storage
Now, you can mount the usb disk!
mkdir /mnt/usb
mount /dev/sda1 /mnt/usb
[USB to Serial : Silicon Labs CP210x]

http://androidhk.com/usb2serial.tar.gz
put the *.ko in /tmp
and then
insmod /tmp/usbserial.ko
insmod /tmp/cp210x.ko
Once you attached the usb2serial adapter, the /dev/ttyUSB0 will be ready to use. Now, you can communicate with the MCU.
Official TLWR703N openwrt page: http://wiki.openwrt.org/toh/tp-link/tl-wr703n
Sunday, February 5, 2012
iModela 3D Milling Machine targets for hobbyist.

iModela is a 3D Milling Machine made by Roland. It is small in size, using CNC milling mechanism to provide 3 axis milling facilities. You can make 2D and 3D objects in your home with this small machine. It costs US$899.
Let'see how it prints 3D object: via http://icreate.rolanddg.com/iModela/Global/English/index.html/
LifeLike android mannequin in Tokyo Store.
This female mannequin is the production of Dr Hiroshi Ishiguro of Osaka University. It looks very real to me, hopefully you will see more of these robots in Tokyo store. May be sometimes they will give you a smile when you passing by.
Monday, January 2, 2012
DIY IR remote on my Android Phone.
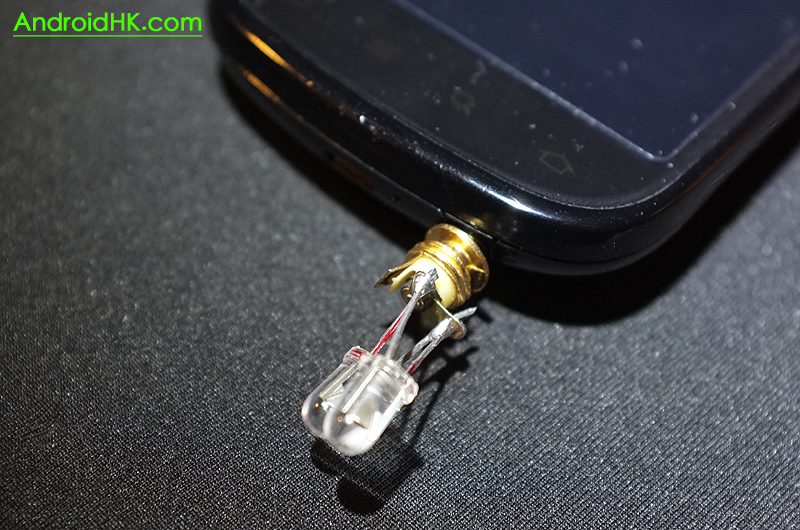
I have followed the instructions here:http://www.instructables.com/id/DIY-Infrared-transmitter-for-iPhone-iPod/#step1 and here: http://www.vladcazan.com/previous-projects/electronics/iphone-remote-control.
The basic idea is using the Left/Right channel on the audio jack to power up two IR LEDs, so when you play a special audio (wave) file on your phone, it will generate the appropiate IR signals to the devices such as TV or your Camera.
It is a very easy hack, may be a good project for the new year start.
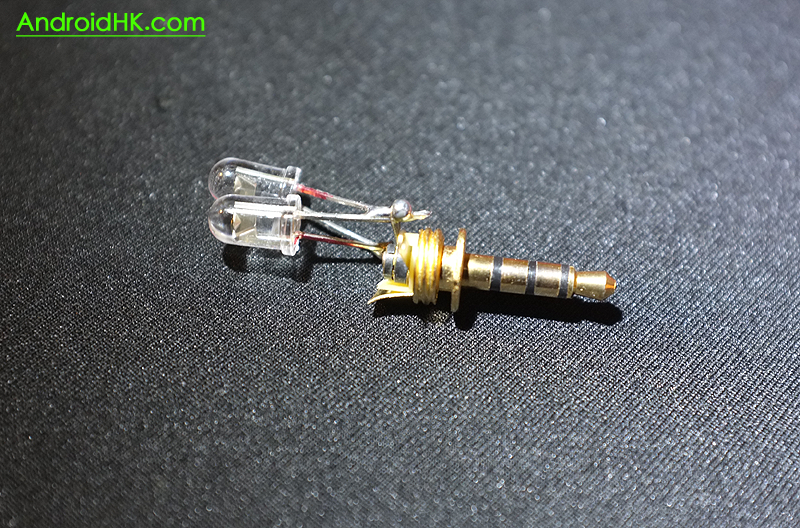
What u needs are only 2 x IR LED and a Audio 3.5mm Plug! Of coz, your phone, I am using Nexus S.
I don't have a TV, so I generate a wave media file to trigger my Canon DSLR, please check out the video:
The signal is not very strong, so sometimes it is not working properly. It may be because of the choice of the IR LED or just the phone won't provide enough power to the LED. It may not be very pratical, but it is fun anyway. Hope u will enjoy. Please do it @ your own risk, it may/may not damage your phone.
Tutorial on How to generate the wave form:
http://www.pentaxforums.com/forums/pentax-dslr-discussion/131633-absurdly-simple-diy-k-x-remote-timer-using-mp3-player.html#post1368821
Canon Trigger Waveform:
http://controlyourcamera.blogspot.com/2010/01/automatically-resume-video-shooting-on.html
My Sample wave form download here:
http://androidhk.com/Canon.wav
Subscribe to:
Posts (Atom)